Self-Hosted Mail with Postfix and Dovecot
Summary
I think that E-Mail is very much taken for granted nowadays, with how easy it is to get access to, and with how much people use it every day. Now, most people will interact with email via an online portal created by the email provider, or via a third-party app that talks with the servers operated by said provider. I, unfortunately, am not as sane as these people, and so want to bring as much of the infrastructure I use on a daily basis under my own control as possible. This post attempts to document my journey of setting up a relatively basic mail server using Postfix and Dovecot.
Is this for Me?
I would love to say "YES", and claim that setting up a mail server is something that anyone and everyone can and should be doing. I choose to believe that having control over your data and the code that operates on said data is valuable. That does not mean that it is the cheapest, simplest, and most maintenance-free option available. After all, GMail is free, any web-based mail is as simple as clicking on a URL, and all serious email providers by necessity have a hands off experience that a child can use (a more accessible UI means a wider user-base).
I chose to set my own mail server up for two reasons: I want to learn how mail works, and I want to own my infrastructure. I am able to do this because I have spare compute (in the form of a Raspberry Pi 4B), and because I am willing to put in the time required to fix and maintain this system if it breaks. It is not "mission critical" to me. Therefore if this sounds like you, and you would also like to set up your own mail server, I would encourage you to do so!
Links and References
Much of the work I did is built on that of those who have done this thing before. Below, I have tried to compile a list of the links that I used during my setup:
- Arch Wiki Mail Server overview post. Gives an example of some of the software alternatives you can use when setting up your own mail server.
- Gentoo Wiki Virtual Mail Server Article, giving an overview of how to set up a mail server with a web-based management console, and a database backend.
- c0ffee's mail server guide, an excellent overview of how to set up postfix and dovecot on FreeBSD. Also implements some additional services (LDAP for unified user authentication with the mail server, and some text search / mail filtering services).
- Postfix TLS documentation, necessary when trying to secure our smtp and submissions services.
- Minimal Dovecot install, without SSL and using a static configuration for mail users. Not directly useful (due to the lack of encryption), but the static configuration is something I tend to prefer. More generally, the Dovecot docs are a good resource when trying to fix a broken install (if verbose).
- DMARC overview, explains what fields exist in a DMARC record and what they mean.
- Armin Reiter's CA certificate tutorial. A simple setup, simply explained.
- Jaime Nguyen's CA tutorial, for a more complex (and realistic) setup. Also excellently explained!
What are we Actually Trying to do?
So we want to set up our own email, how do we go about this? E-Mail is broken down into largely three independent parts:
- software that sends and receives email - i.e. postfix
- software that manages and "delivers email" to an electronic mailbox - i.e. dovecot
- software that lets you interact with your mailbox - i.e. your email client
So, in order to have our own mail server, we will need to install a MTA and configure it such that it can talk to other MTAs and both send mail to and receive mail from them, we will need to install a MDA to deliver any mail received by our MTA to our mailbox, and finally we will need to setup our email client to talk to both the MTA (to allow us to send emails we compose) and the MDA (to fetch and display the contents of our mailbox).
As mentioned above, for our MTA we will install postfix, and for our MDA we will install dovecot. We choose these because they seem fairly common, and have decent enough configuration options. For the email client, I personally use mutt on my desktop and laptops, and thunderbird on my Android phone, and will show the minimal configuration necessary for those.
Our Configuration
Behold, a pictoral representation of our desired setup. I will explain later, but a picture is worth a thousand words anyway:
So, explanation time. Postfix is our MTA, and so holds both a SMTP client for sending our mail to external mail servers, and a SMTP server to receive incoming mail from external servers and our mail clients. Traditionally, SMTP servers ran over port 25, port 465, or port 587. Port 25 was used for unencrypted traffic, port 465 for traffic implicitly encrypted with SSL/TLS, and port 587 was for initially unencrypted traffic that was upgraded using the STARTTLS command. We will definitely not use STARTTLS due to it being an upgrade protocol (hence, starting in cleartext) and having known STARTTLS stripping attacks (see this presentation, for example). Additionally, since RFC8314, the IETF has designated TCP port 465 as the "submissions" port for implicit TLS. But this leaves us with the question of using port 25.
In a perfect world, we would encrypt all the things, and it would be cheap, and no-one could every spy on our traffic, and it would all be sunshine and rainbows. Unfortunately, we do not live in such a world. As such, we have to accept that despite client-to-server SMTP traffic over port 465 being encrypted, server-to-server SMTP traffic over port 25 can at best use STARTTLS. This is unavoidable, as we very much want other email servers to talk to us. After all, what use is a mail service that only ever sends email? So, we have to keep both open. Hence, our setup has SMTP over port 25 secured with STARTTLS, and submissions over port 465, secured with TLS1.3.
Of note is the addition of OpenDKIM as a mail filter. This will allow us to sign outgoing mail with our DKIM keys, allowing external servers to verify that our mail comes from the correct domain and reducing the chance it is marked as spam. This is internal to our mail server, and communication will be done over a unix socket.
Next, our MDA, dovecot. Dovecot will accept incoming mail received by postfix over the LMTP protocol (literally "Local Mail Transfer Protocol"), but this is internal to the mail server. However, it will still have to talk to external mail clients to send them the contents of our mailbox, which is typically done using the IMAP(S) protocol. Traditionally, port 143 and port 993 have both been used with port 143 sometimes being unencrypted and sometimes being encrypted with TLS, while port 993 had tended to be encrypted with SSL. Technically, TLS is SSL (a newer version, but still internally treated as SSLv3), and so we will use IMAPS over port 993, again secured with TLS1.3, to avoid any confusion.
Finally, mail clients. I will not talk too much about this, because this is as much personal preference as anything else. Note that not every mail client supports every mail server configuration. In particular, using client certificates seems unsupported or unimplemented in pretty much every mainstream mail client I have looked at. Granted, Outlook, Gmail, and Apple's Mail are not a massive sample size, but I believe that they are representative of what most users will run. As stated in the introduction, I will only cover my use case, which is mutt for desktop use, and thunderbird for android for mobile use. Your mileage may vary on this setup.
Preparation
First thing to do is to create a user for our mail system. I personally dislike running a full-blown database for such small setups, especially on lower-end devices. We will keep our mail server using static configuration files as much as possible becase 1) this is easier, 2) it is faster and less resource hungry than spinning up a database engine, and 3) it gives you all the flexibility you would need for a personal mail server anyway. We must also set up the DNS records for our domain, to point to our mail server, and to set up both DMARC and SPF records.
Creating our vmail User
As root, perform the following commands:
$ groupadd -g 5000 vmail
$ useradd -u 5000 -g 5000 -d /var/vmail -M vmail
$ mkdir /var/vmail
$ chown vmail:vmail /var/vmail
$ chmod 2770 /var/vmail
We need to create our vmail user and group. We don't necessarily want the
/var/vmail directory to include any dotfiles (e.g. .bashrc,
.bash_profile) so we create the home directory ourselves.
Because we make it ourselves, we then need to ensure it is owned by the
vmail user, and set its permissions. Instead of the traditional 0755 permission
octal, we choose 2770: 2 meaning that the directory has the setgid access flag,
the first 7 meaning the owner has read, write, and execute permissions, the
next 7 meaning that all users with the same group have the same permissions,
and the final 0 meaning that any other users have no access.
Creating our Local CA, and our User Certificates
To generate per-user certificates, we need to create a root "CA" certificate. I use the below script to do this:
#!/bin/sh

# TODO: replace this with your domain
DOMAIN="example.com"

# password for out .p12 PCKS certificate file
PCKSPASS="password"

# TODO: replace with all services you want certificates for
SERVICES="postfix dovecot"

# TODO: replace will all users you want personal certificates for
USERS="john"

set -ex

# certificate authority
# NOTE: this is not how you should do a proper CA. really, the certificate we
#       generate here should be help in an airgapped system, and a secondary
#       certificate should be generated and signed by it. that way, this secondary
#       certificate can be used to sign service / user certificates, and can be
#       easily revoked if necessary (while our original, airgapped certificate
#       is safe and cannot easily be leaked).
if [ ! "${REFRESH_CA:-z}" = "z" ]; then
	openssl ecparam -genkey -name prime256v1 -out ca.key
	openssl req -x509 -new -key ca.key -sha512 -days 9999 -out ca.crt -subj "/CN=$DOMAIN"
fi

# service certificates
mkdir -p services
for serv in $SERVICES; do
	mkdir -p services/$serv
	openssl ecparam -genkey -name prime256v1 -noout -out services/$serv/ecc.key
	openssl req -new -out services/$serv/ecc.csr -key services/$serv/ecc.key -subj "/CN=$DOMAIN/x500UniqueIdentifier=$serv"
	openssl x509 -req -in services/$serv/ecc.csr -CA ca.crt -CAkey ca.key -CAcreateserial -out services/$serv/ecc.crt -sha512 -days 365
	cat services/$serv/ecc.crt services/$serv/ecc.key > services/$serv/ecc.$serv.pem

	if [ ! "${SERVICE_RSA_CERTS:-z}" = "z" ]; then
		openssl req -new -nodes -out services/$serv/rsa.csr -keyout services/$serv/rsa.key -newkey rsa:4096 -subj "/CN=$DOMAIN/x500UniqueIdentifier=$serv"
		openssl x509 -req -in services/$serv/rsa.csr -CA ca.crt -CAkey ca.key -CAcreateserial -out services/$serv/rsa.crt -sha512 -days 365
		cat services/$serv/rsa.crt services/$serv/rsa.key > services/$serv/rsa.$serv.pem
	fi
done

# user certificates
mkdir -p users
for user in $USERS; do
	mkdir -p users/$user
	openssl ecparam -genkey -name prime256v1 -noout -out users/$user/ecc.key
	openssl req -new -out users/$user/ecc.csr -key users/$user/ecc.key -subj "/CN=$DOMAIN/emailAddress=$user@$DOMAIN/x500UniqueIdentifier=$user"
	openssl x509 -req -in users/$user/ecc.csr -CA ca.crt -CAkey ca.key -CAcreateserial -out users/$user/ecc.crt -sha512 -days 365
	cat users/$user/ecc.crt users/$user/ecc.key > users/$user/ecc.$user.pem

  # we generate a pcks12 certificate to allow easy importing under android
	openssl pkcs12 -export -out users/$user/ecc.$user.pfx.p12 -in users/$user/ecc.crt -inkey users/$user/ecc.key -passout "pass:$PCKSPASS"
done
Creating our DNS Records
Our mail server needs to be accessible over the web, and to do so we will edit our DNS zone on our DNS server (or on our DNS provider's online gateway). We will provide example records for BIND, but please adapt these to your chosen DNS server (or, the relevant fields and buttons in your DNS provider's web UI).
At minimum, we need an MX record that will define a mail server for our
domain, and an A/AAAA record to define the IP address of the mail server. Note
that in the below examples, x.y.z.w refers to an IPv4 address,
and w.z.y.x refers to the reversed form of the same address.
example.com. IN MX 10 mail.example.com.
mail.example.com. IN A x.y.z.w

# Optionally, for IPv6 connectivity instead
# mail.example.com. IN AAAA a:b:c:d:e:f:g:h

# Optionally, can define a CNAME record to point mail.example.com to example.com instead of the A record
# if our mail server is hosted on the same server as example.com
# mail.example.com. IN CNAME example.com.
We must define a PTR record that allows a mail server to verify that the IP address an email is coming from is the one defined to send email (via its MX record). Not defining this PTR record means that you will be marked as spam, or simply rejected, by most email providers.
w.z.y.x.in-addr.arpa. IN PTR example.com

# If you chose to not alias your mail domain, use this instead
# w.z.y.x.in-addr.arpa. IN PTR mail.example.com
The next record we must define is an SPF record for our root domain, to tell other mail servers how to accept mail for our domain. We want to only allow mail to be received from mail servers specified in our MX records, and any other mail should not be accepted (as it was not sent by us, and is spoofed).
example.com. IN TXT "v=spf1 mx ~all"After SPF, we must set up our DKIM record, which contains the public key that will be used by external mail recipients to verify mail sent from our email server. This is an anti-spam measure enforced by pretty much every mainstream mail provider, and so is pretty much necessary to set up. Note, that the actual value for this record will be given to us later when we set up OpenDKIM.
mail._domainkey IN TXT ( "v=DKIM1; k=rsa; p=my/publickey+signature" )Finally, we must set up DMARC, which is used to tell other mail servers what to do with email that fails the SPF or DKIM checks (and allows reports of such failures to be sent to a given address). This is again necessary for mail coming from our mail server to be marked as authenticated by mail providers.
_dmarc.example.com. IN TXT "v=DMARC1;p=quarantine;ruf=mailto:forensic@example.com;rua=mailto:aggregate@example.com"OpenDKIM
DKIM (or, DomainKeys Identified Mail), is an anti-spam measure enforced by most mainstream email providers. It will sign all outgoing mail with a private key, whose corresponding public key is available via a DNS record.
After installing the OpenDKIM package, you will need to modify the config file, possibly modify the postfix and opendkim users to allow for local unix socket access, and generate keys for your domain. The following webpage is what I followed to get a local unix socket, and this webpage is what I followed to actually create the keys and configure postfix. Your mileage may vary depending on your OS!
My /etc/opendkim/opendkim.conf file is as follows:
# This is a simple config file for signing and verifying

#LogWhy                 yes
Syslog                  yes
SyslogSuccess           yes

Canonicalization	relaxed/relaxed

Domain			example.com
Selector		mail
KeyFile			/var/lib/opendkim/mail.private

# To use a local socket instead, specify a path here. The "standard"
# location is under /run/opendkim, and it's best to agree
# on that directory so that various init systems can configure its
# permissions and ownership automatically.
Socket                 local:/run/opendkim/opendkim.sock

#Socket                  inet:8891@localhost

ReportAddress           postmaster@example.com
SendReports             yes

## Hosts to sign email for - 127.0.0.1 is default
## See the OPERATION section of opendkim(8) for more information
#
# InternalHosts		192.168.0.0/16, 10.0.0.0/8, 172.16.0.0/12

## For secondary mailservers - indicates not to sign or verify messages
## from these hosts
#
# PeerList		X.X.X.X

# PidFile		/run/opendkim.pid

# The UMask is really only used for the PID file (root:root) and the
# local UNIX socket, if you're using one. It should be 0117 for the
# socket.
UMask			0117
UserID			opendkim

# For use with unbound
#TrustAnchorFile	/etc/dnssec/root-anchors.txt
Postfix
Setting up postfix is relatively straightforward. Install the postfix package for your relevant distro. In my case, I enabled lmdb support to provide whatever "database" services postfix needed without resorting to a more heavyweight database engine.
After installing postfix, we need to provide it two configuration files, a
/etc/postfix/main.cf file defines settings for postfix itself,
and a /etc/postfix/master.cf file that defines what services
postfix provides (i.e. smtp(s), submission(s)).
For informing postfix of the local email users (and their aliases!) we must
first generate an "aliases" file. I chose to place this at
/etc/mail/aliases. One potential aliases file can look as
follows:
# Basic system aliases -- these MUST be present.
MAILER-DAEMON:      postmaster
postmaster:         root

# General redirections for pseudo accounts.
adm:                root
bin:                root
daemon:             root
exim:               root
lp:                 root
mail:               root
named:              root
nobody:             root
postfix:            root

# Well-known aliases -- these should be filled in!
root:               john+root
operator:           john+operator

# dmarc report address
report:             john+report

# Standard RFC2142 aliases
abuse:              postmaster
ftp:                root
hostmaster:         root
news:               usenet
noc:                root
security:           root
usenet:             root
uucp:               root
webmaster:          root
www:                webmaster

# trap decode to catch security attacks
decode:             /dev/null

# our actual users and their aliases
john:             john
After creating this file for the first time, make sure to run the following command:
$ newalias /etc/mail/aliasesWhenever you update the aliases file, you need to rerun the following, slightly different command:
$ postalias /etc/mail/aliases
My /etc/postfix/main.cf file is as follows:
mail_owner = postfix

# TODO: change these to your real domain
myhostname = mail.example.com
mydomain = example.com

myorigin = $mydomain

#inet_interfaces = $myhostname, localhost
inet_interfaces = 192.168.2.101, localhost
inet_protocols = ipv4

mydestination = $myhostname, $mydomain, localhost.$mydomain, localhost

# our local user aliases we generated earlier
alias_maps = lmdb:/etc/mail/aliases
local_recipient_maps = $alias_maps

address_verify_map = lmdb:$data_directory/verify_cache

# reject mail
unknown_local_recipient_reject_code = 550

mynetworks_style = host
# OR
#mynetworks = 192.168.2.0/24, 127.0.0.0/8

recipient_delimiter = +

virtual_uid_maps = static:980
virtual_gid_maps = static:980
virtual_mailbox_base = /var/vmail

# disable "new mail" notification for local users
biff = no

# reduce information given to snoopers, "NO UCE" can help with reducing spam
smtpd_banner = $myhostname ESMTP NO UCE

# require email addresses of form '@.'
allow_percent_hack = no
swap_bangpath = no

# dont allow spammers to use vrfy to scrape valid mail users
disable_vrfy_command = yes

# dont give information if mailbox does not exist
show_user_unknown_table_name = no

# maximum mta message size: 32 MiB
# NOTE: we also set the maximum mailbox size to ensure we can receive the
#       mta message, but otherwise we don't care about it because we will use
#       dovecot for writing the mailbox
message_size_limit = 33554432
mailbox_size_limit = 33554432

# opendkim
smtpd_milters = unix:/run/opendkim/opendkim.sock
non_smtpd_milters = $smtpd_milters

# lmtp, we will set up dovecot in a second
mailbox_transport = lmtp:unix:private/dovecot-lmtp

# optional tls for sending mail, with optional DNSSEC verification
smtp_tls_security_level = dane
smtp_dns_support_level = dnssec
# OR
# optional tls for sending mail
#smtp_tls_security_level = may

# tls certificates to use when sending out mail
# TODO: replace these with your ssl certificates
smtp_tls_CAfile = /etc/ssl/certs/ca-certificates.crt
smtp_tls_eccert_file = /root/certs/example.com/fullchain.pem
smtp_tls_eckey_file = /root/certs/example.com/privkey.pem

# tls settings for receiving mail, realistically this could be dropped to TLSv1.2
smtpd_tls_mandatory_protocols = TLSv1.3
smtpd_tls_mandatory_ciphers = high
tls_ssl_options = no_ticket, no_compression

# when receiving mail, require sender to use encryption
smtpd_tls_security_level = encrypt

# tls certificates for receiving mail
# TODO: replace these with your ssl certificates
smtpd_tls_CAfile = /etc/ssl/certs/ca-certificates.crt
smtpd_tls_eccert_file = /root/certs/example.com/fullchain.pem
smtpd_tls_eckey_file = /root/certs/example.com/privkey.pem

smtp_tls_loglevel = 1
smtpd_tls_loglevel = 1

#smtpd_tls_received_header = yes
smtpd_tls_auth_only = yes

# require that mail servers identify themselves to try to reduce spam
smtpd_helo_required = yes

# sasl, again we will set up dovecot in a second
smtpd_sasl_type = dovecot
smtpd_sasl_path = private/auth

smtpd_sasl_local_domain=$mydomain

broken_sasl_auth_clients = no

smtpd_sasl_auth_enable = yes
smtpd_sasl_authenticated_header = yes

# don't allow plaintext auth methods on unencrypted connections
smtpd_sasl_security_options = noanonymous, noplaintext

# ... but plaintext auth is fine when using TLS
smtpd_sasl_tls_security_options = noanonymous

# mail restrictions, to limit spam and unauthorised connections

smtpd_client_restrictions = permit_mynetworks,
			   permit_sasl_authenticated,
			   reject_unknown_reverse_client_hostname,
			   reject_unauth_pipelining

smtpd_helo_restrictions = permit_mynetworks,
			 permit_sasl_authenticated,
			 reject_invalid_helo_hostname,
			 reject_non_fqdn_helo_hostname,
			 reject_unauth_pipelining

smtpd_sender_restrictions = permit_mynetworks,
			   permit_sasl_authenticated,
			   reject_non_fqdn_sender,
			   reject_unknown_sender_domain,
			   reject_unauth_pipelining

smtpd_recipient_restrictions = permit_mynetworks,
			      permit_sasl_authenticated,
			      reject_non_fqdn_recipient,
			      reject_unknown_recipient_domain,
			      reject_unauth_pipelining,
			      reject_unverified_recipient
			      #reject_rbl_client zen.spamhaus.org,
			      #reject_rbl_client bl.smapcop.net

smtpd_relay_restrictions = permit_mynetworks,
			  permit_sasl_authenticated,
			  reject_unauth_destination

smtpd_data_restrictions = permit_mynetworks,
			 permit_sasl_authenticated,
			 reject_multi_recipient_bounce,
			 reject_unauth_pipelining
My /etc/postfix/master.cf file is as follows:
#
# Postfix master process configuration file.  For details on the format
# of the file, see the master(5) manual page (command: "man 5 master" or
# on-line: http://www.postfix.org/master.5.html).
#
# Do not forget to execute "postfix reload" after editing this file.
#
# ==========================================================================
# service type  private unpriv  chroot  wakeup  maxproc command + args
#               (yes)   (yes)   (no)    (never) (100)
# ==========================================================================
smtp      inet  n       -       n       -       -       smtpd
  -o smtpd_sasl_auth_enable=no
  -o smtpd_tls_ask_ccert=yes

#submission inet n       -       n       -       -       smtpd
#  -o syslog_name=postfix/submission
#  -o smtpd_tls_req_ccert=yes

submissions     inet  n       -       n       -       -       smtpd
  -o syslog_name=postfix/submissions
  -o smtpd_tls_wrappermode=yes
  -o smtpd_tls_req_ccert=yes

pickup    unix  n       -       n       60      1       pickup
cleanup   unix  n       -       n       -       0       cleanup
qmgr      unix  n       -       n       300     1       qmgr
#qmgr     unix  n       -       n       300     1       oqmgr
tlsmgr    unix  -       -       n       1000?   1       tlsmgr
rewrite   unix  -       -       n       -       -       trivial-rewrite
bounce    unix  -       -       n       -       0       bounce
defer     unix  -       -       n       -       0       bounce
trace     unix  -       -       n       -       0       bounce
verify    unix  -       -       n       -       1       verify
flush     unix  n       -       n       1000?   0       flush
proxymap  unix  -       -       n       -       -       proxymap
proxywrite unix -       -       n       -       1       proxymap
smtp      unix  -       -       n       -       -       smtp
relay     unix  -       -       n       -       -       smtp
        -o syslog_name=${multi_instance_name?{$multi_instance_name}:{postfix}}/$service_name
#       -o smtp_helo_timeout=5 -o smtp_connect_timeout=5
showq     unix  n       -       n       -       -       showq
error     unix  -       -       n       -       -       error
retry     unix  -       -       n       -       -       error
discard   unix  -       -       n       -       -       discard
local     unix  -       n       n       -       -       local
virtual   unix  -       n       n       -       -       virtual
lmtp      unix  -       -       n       -       -       lmtp
anvil     unix  -       -       n       -       1       anvil
scache    unix  -       -       n       -       1       scache
postlog   unix-dgram n  -       n       -       1       postlogd
Dovecot
Dovecot is similarly straightforward to install and configure. After installing the dovecot package, we need to provide it with a single config file. However, since we want to have a simple password file as well, we must create that first.
I chose to place my mail users' password file at /etc/mail/users.
The contents of this file are similar to /etc/shadow, and
user passwords can be added to it using the following command:
$ echo "john:$(doveadm pw -p yourpassword)::::::" >> /etc/mail/usersFinally, we can finally create our final dovecot config.
My /etc/dovecot/dovecot.conf is as follows:
protocols = imap lmtp

# debugging help
#auth_verbose = yes
#auth_debug = yes
#mail_debug = yes
#verbose_ssl = yes

log_path = /var/log/dovecot.log

dict {
  #quota = mysql:/etc/dovecot/dovecot-dict-sql.conf.ext
}

# auth
# ============================================================================

disable_plaintext_auth = yes

auth_username_chars = abcdefghijklmnopqrstuvwxyzABCDEFGHIJKLMNOPQRSTUVWXYZ01234567890.-_@

auth_username_format = %Ln
auth_anonymous_username = anonymous

auth_mechanisms = plain login

# to support smtp clients who cannot present client certificates, but require
# them for imap
protocol !smtp {
  auth_ssl_require_client_cert = yes
}

# we will get the username from whatever client certificate was presented
auth_ssl_username_from_cert = yes

# NOTE: using auth cache means we MUST reload dovecot after changing passwords
# NOTE: using auth cache requires different passdb driver
#auth_cache_size = 10M
#auth_cache_ttl = 300s
#auth_cache_negative_ttl = 60s
#auth_cache_verify_password_with_worker = yes

# lets use a plaintext password file. really, we could omit this and only require
# the client certificates, but this is a trivial additional layer of security that
# is easy enough to swap out and might buy you some time if the certificate gets
# leaked
passdb {
  driver = passwd-file
  args = scheme=CRYPT username_format=%Ln /etc/mail/users
  # args = cache_key=%u:%w
}

# we must use our vmail user to store all mail for users
userdb {
  driver = static
  args = uid=vmail gid=vmail home=/var/vmail/%Ln
#  default_fields = quota_rule=*:storage=1G
}

# ssl
# ============================================================================

ssl = required

# TODO: swap these out with your own tls certificates
ssl_cert = </root/certs/example.com/fullchain.pem
ssl_key = </root/certs/example.com/privkey.pem

# NOTE: this is the root ca for our user certificates
ssl_ca = </root/ca/ca.crt

# TODO: do we actually care about verifying that our user certificates expired?
ssl_require_crl = no

ssl_client_require_valid_cert = yes
ssl_verify_client_cert = yes

# which certificate field to get the username from
#ssl_cert_username_field = commonName
#ssl_cert_username_field = emailAddress
ssl_cert_username_field = x500UniqueIdentifier

ssl_min_protocol = TLSv1.3
ssl_cipher_list = ECDHE-ECDSA-AES256-GCM-SHA384:ECDHE-RSA-AES256-GCM-SHA384:ECDHE-ECDSA-CHACHA20-POLY1305:ECDHE-RSA-CHACHA20-POLY1305:ECDHE-ECDSA-AES128-GCM-SHA256:ECDHE-RSA-AES128-GCM-SHA256:ECDHE-ECDSA-AES256-SHA384:ECDHE-RSA-AES256-SHA384:ECDHE-ECDSA-AES128-SHA256:ECDHE-RSA-AES128-SHA256
ssl_curve_list = X25519:prime256v1:secp384r1
ssl_prefer_server_ciphers = yes
ssl_options = no_ticket, no_compression

# mail
# ============================================================================

mail_location = maildir:~/.maildir

namespace inbox {
  inbox = yes
  separator = /
}

mailbox_idle_check_interval = 30 secs

# master
# ============================================================================

service imap-login {
  # NOTE: we do not expose our unsecured imap listener to our local (or wider) network
  inet_listener imap {
    address = 127.0.0.1, ::1
    port = 143
  }

  inet_listener imaps {
    port = 993
    ssl = yes
  }

  #service_count = 1
  #process_min_avail = 0
  #vsz_limit = $default_vsz_limit
}

service imap {
  #vsz_limit = $default_vsz_limit
  #process_limit = 1024
}

# here is the lmtp listener where postfix will deliver mail to
service lmtp {
  unix_listener /var/spool/postfix/private/dovecot-lmtp {
    mode = 0666
    user = postfix
    group = postfix
  }
}

# here is where postfix will attempt to login via sasl
service auth {
  # Postfix smtp-auth
  unix_listener /var/spool/postfix/private/auth {
    mode = 0666
    user = postfix
    group = postfix
  }
}

service auth-worker {
  #user = root
}

# mailboxes
# ============================================================================

namespace inbox {
  # These mailboxes are widely used and could perhaps be created automatically:
  mailbox Archive {
    special_use = \Archive
    auto = subscribe
  }
  mailbox Drafts {
    special_use = \Drafts
    auto = subscribe
  }
  mailbox Junk {
    special_use = \Junk
    auto = subscribe
  }
  mailbox Trash {
    special_use = \Trash
    auto = subscribe
  }

  # For \Sent mailboxes there are two widely used names. We'll mark both of
  # them as \Sent. User typically deletes one of them if duplicates are created.
  mailbox Sent {
    special_use = \Sent
    auto = subscribe
  }
  mailbox "Sent Messages" {
    special_use = \Sent
  }

  # If you have a virtual "All messages" mailbox:
  #mailbox virtual/All {
  #  special_use = \All
  #  comment = All my messages
  #}

  # If you have a virtual "Flagged" mailbox:
  #mailbox virtual/Flagged {
  #  special_use = \Flagged
  #  comment = All my flagged messages
  #}

  # If you have a virtual "Important" mailbox:
  #mailbox virtual/Important {
  #  special_use = \Important
  #  comment = All my important messages
  #}
}
Configuring Mutt
I won't dwell too much on this, but the core setup that is necessary is
the snippet below. Whether you include this directly in your
.muttrc, or add this snippet in a per-user config, is up to
you!
# TODO: replace this with wherever you store the user certificate we generated
#       earlier!
set ssl_client_cert=/home/john/.config/mutt/ecc.john.pem

# IMAP
# ============================================================================

set folder      = imaps://mail.example.com/

set spoolfile	= +INBOX
set postponed	= +Drafts
set record	= +Sent

# here you should add all mailboxes you added to your dovecot configuration
mailboxes 	= +INBOX +Drafts +Sent

# NOTE: this is not necessary, because we get our username from our client
#       certificate. however, include it if you dont want to use such certificates
set imap_user   = john

# allow Mutt to open a new IMAP connection automatically
unset imap_passive

# keep the IMAP connection alive by polling intermittently (in seconds)
set imap_keepalive = 300

# how often to check for new mail (in seconds)
set mail_check = 120

# SMTP
# ============================================================================

set smtp_authenticators = "login"

set smtp_url	= smtps://$imap_user@mail.example.com/

set realname	= "John Doe"
set from	= "john@example.com"
Configuring Thunderbird on Android
All that is required for setting up thunderbird is to first install the previously generated CA certificate (or intermediate CA certificate, if using a more proper approach) on your android device. Then, your user certificate must also be installed, and has to be in the PCKS12 format for this:
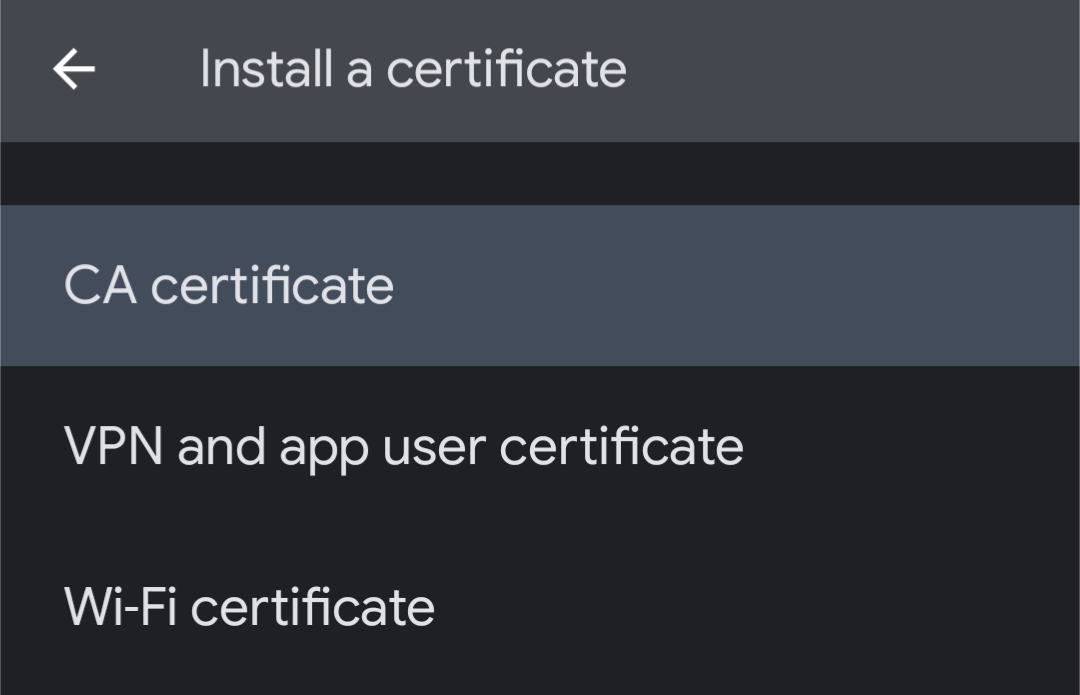
To install both CA and user certificates, go to your android settings, and search for "certificates". This page should show up. First install your CA certificate (must be in .pem format), and then install your user certificate (must be in .pfx.p12 format):
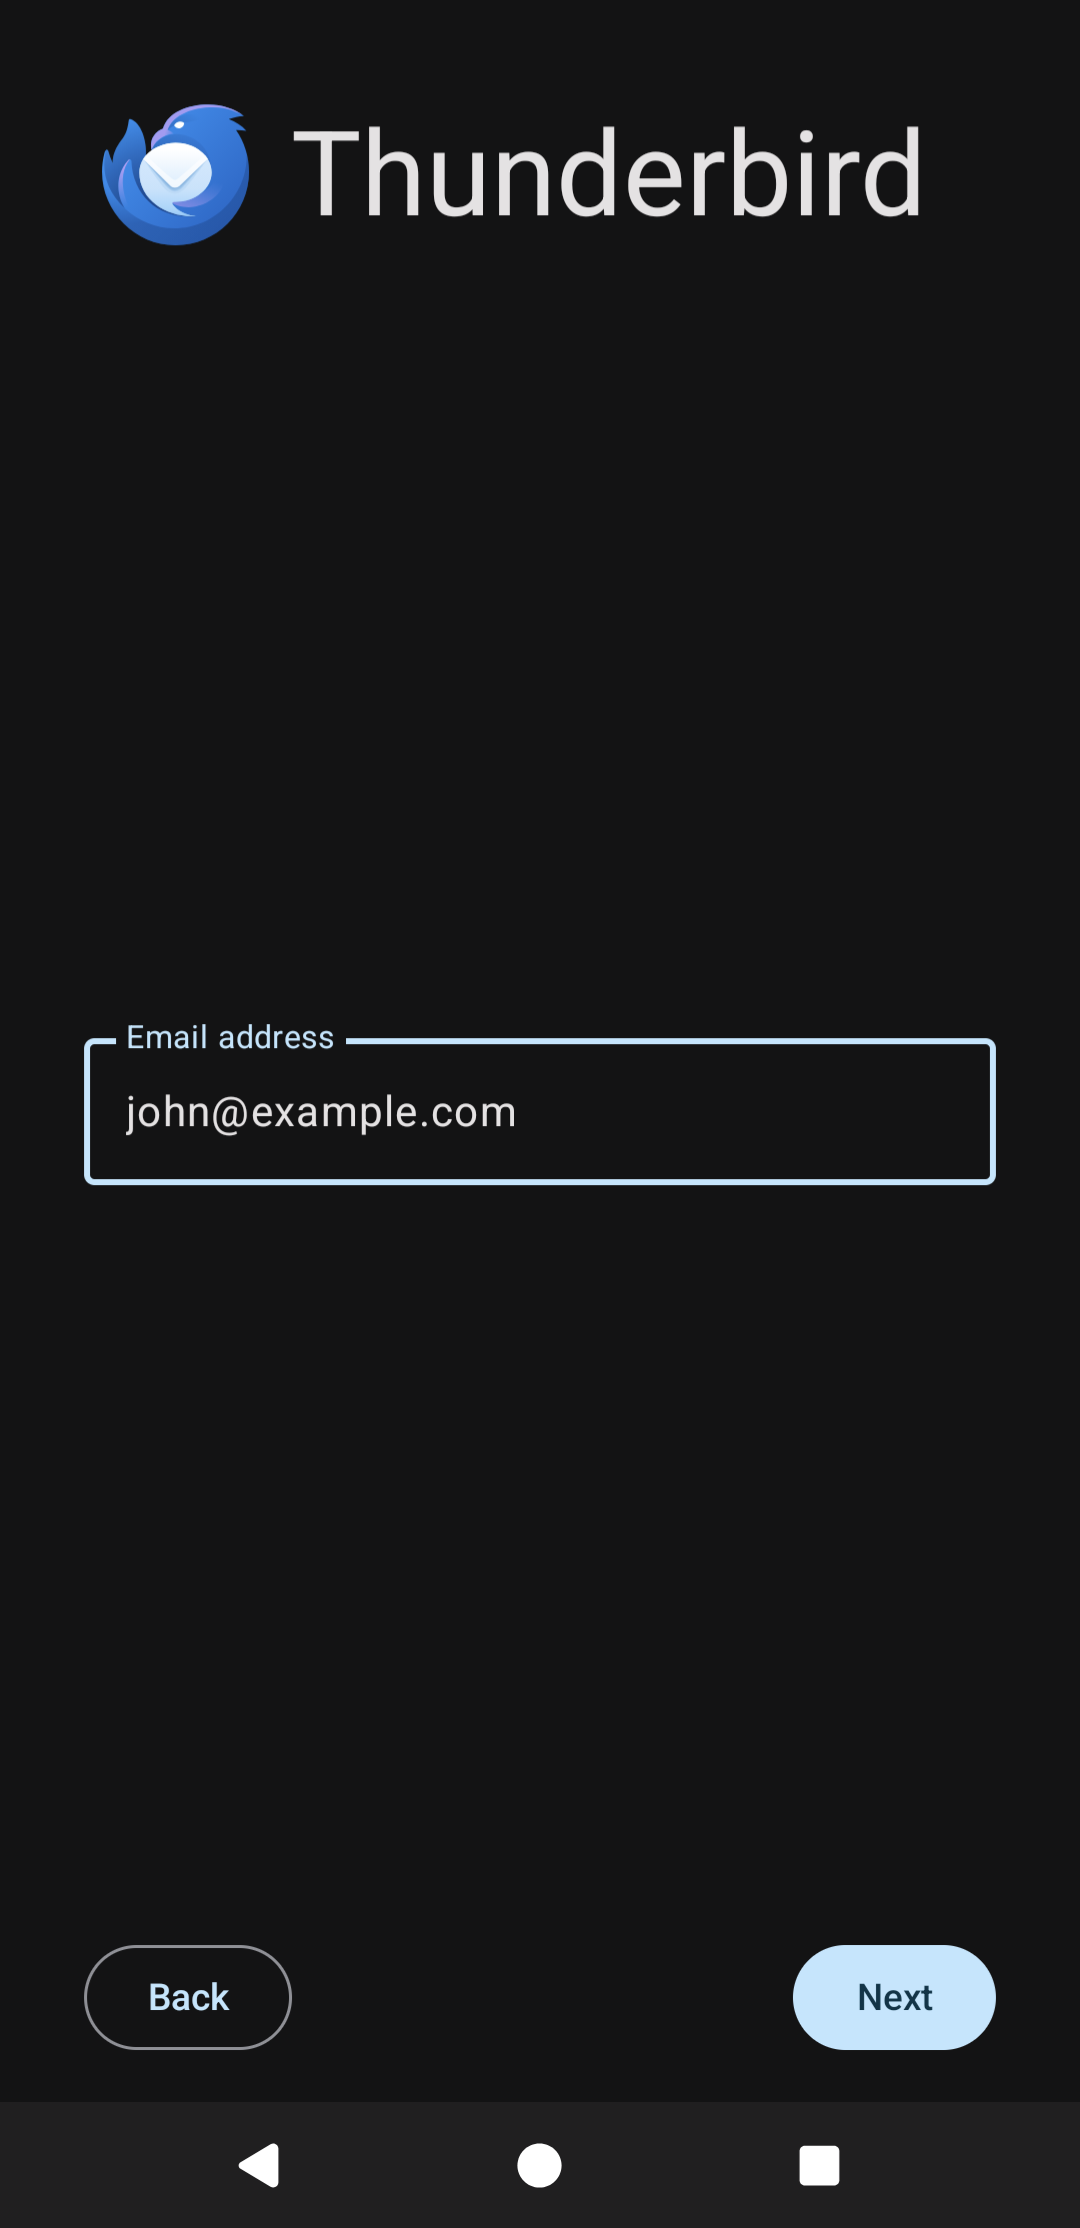
After installing your certificates, continue with setting up thunderbird as normal. Add a new account. Note that Thunderbird will not be able to lookup your server's configuration the first time you press "Next", and will complain. Just press "Next" again in this case to enter manual configuration:
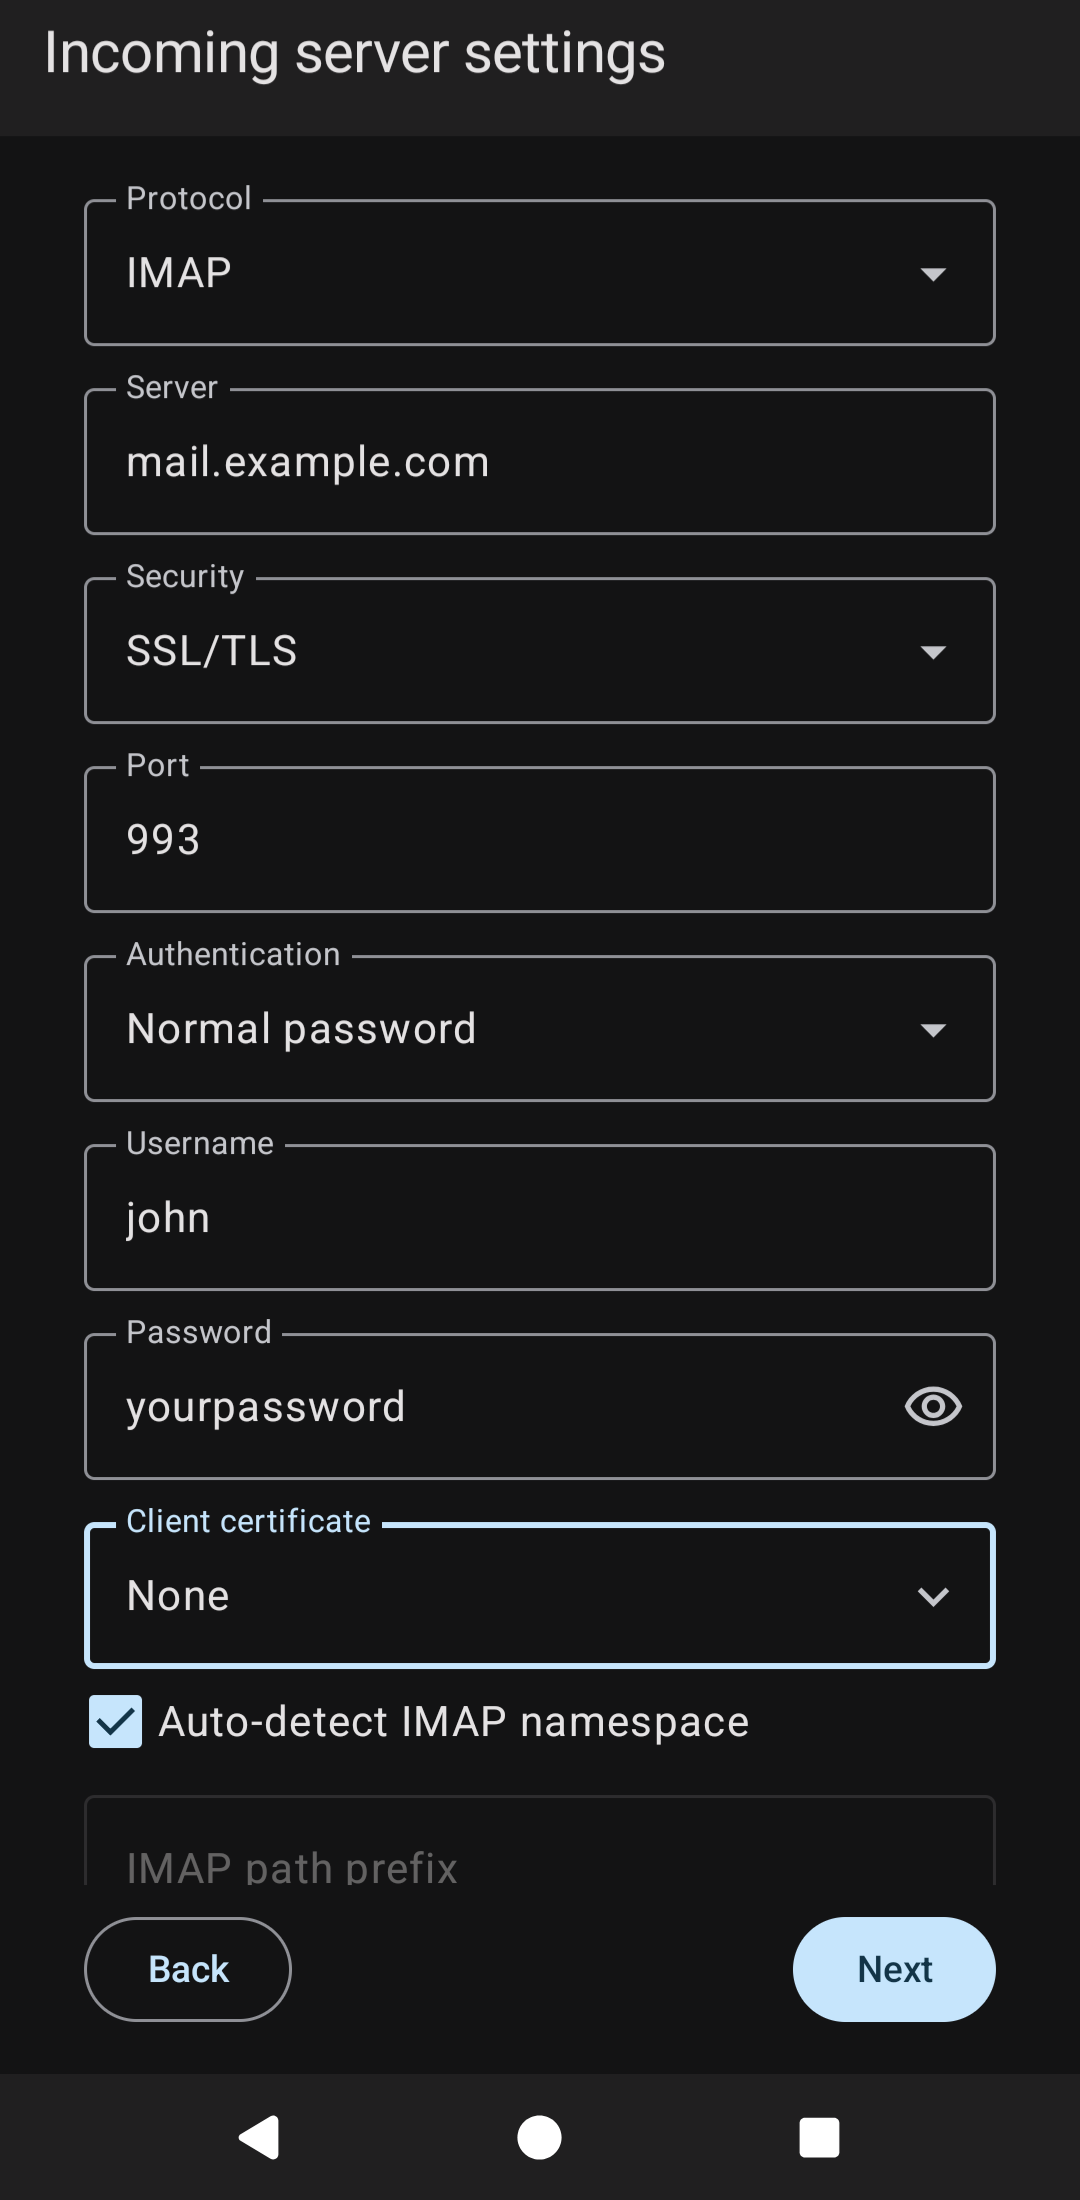
Configure your "incoming", or imap, settings. This will allow you to read mail sent to you. Make sure to your a "normal password", not any of the other options, and select the user certificate we installed earlier:
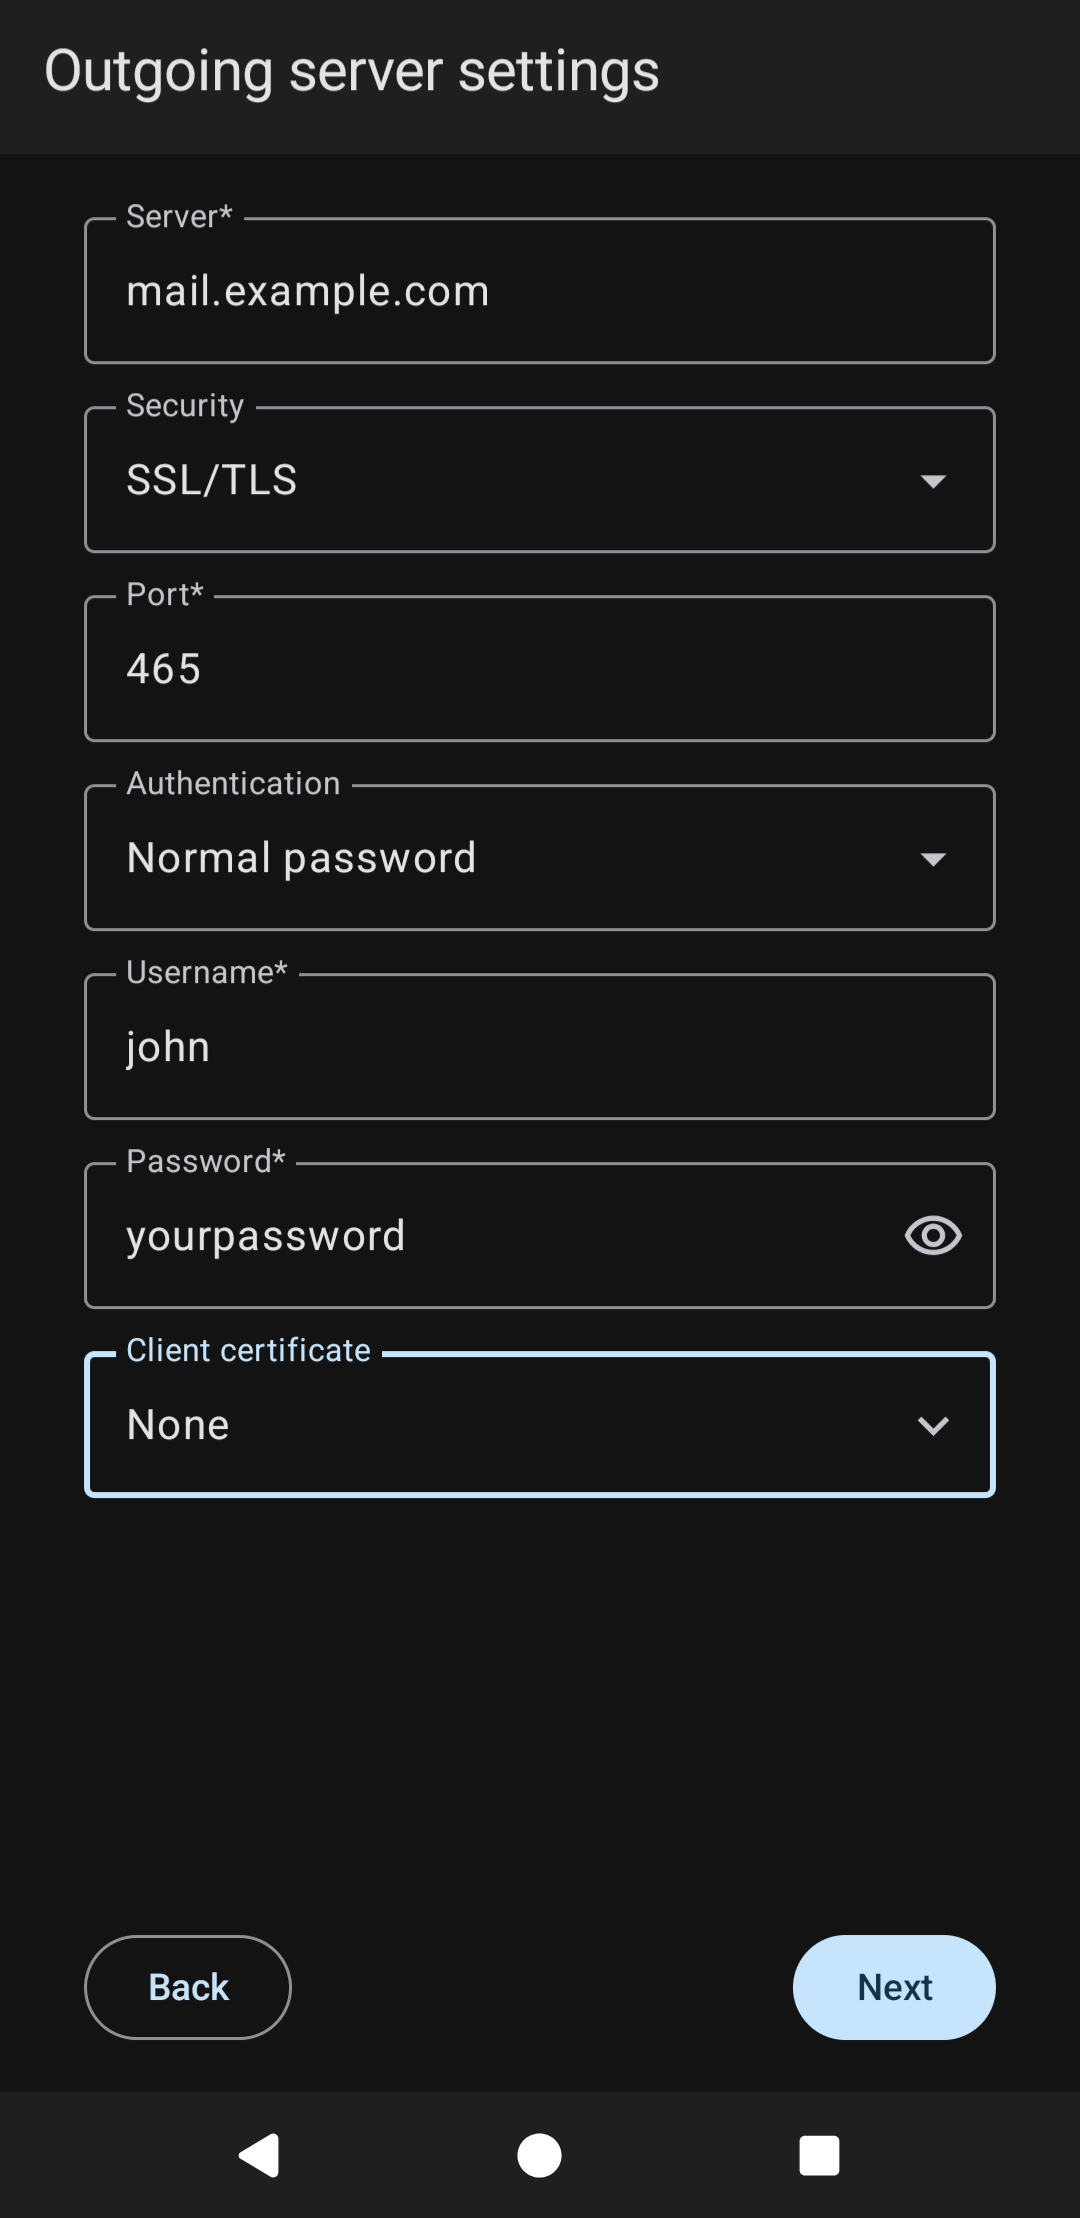
Configure your "outgoing", or smtp, settings. This will allow you to send mail. Make sure to again use "normal password", and provide the user certificate:
Finally, enter your email address and choose what real name to give (and optionally, what signature to have in all outgoing emails):
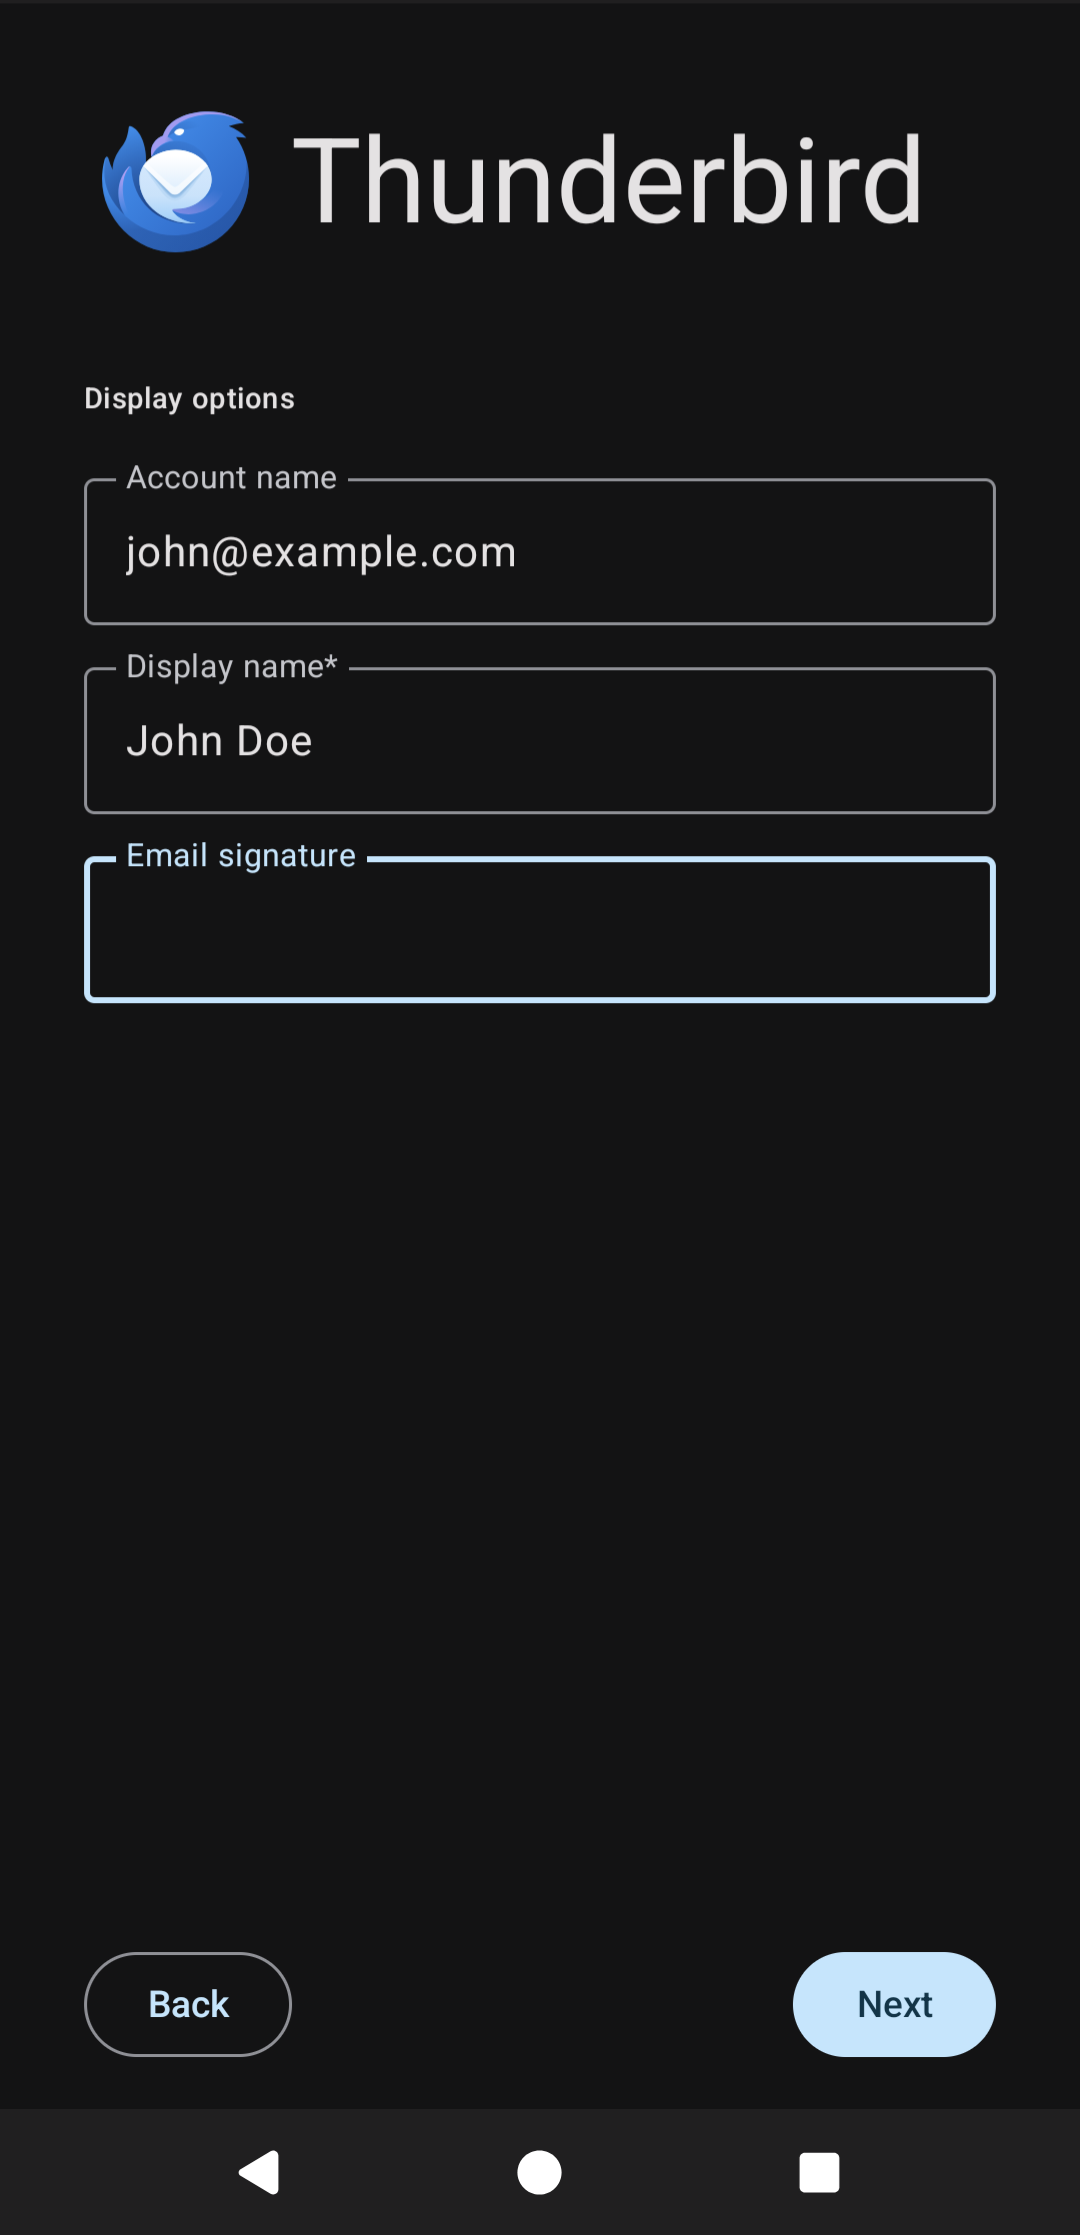
After this, your thunderbird client should be set up and working!
Conclusion
That was how to set up a mail server. Hopefully this was useful to you!